As an affiliate, we may earn a commission from qualifying purchases. We get commissions for purchases made through links on this website from Amazon and other third parties.
The DTC U11E9 Error Code can be quite confusing for car owners. In this article, we will explore the meaning of the DTC U11E9 Error Code and provide some possible fixes to help you resolve the issue.
Whether you’re a seasoned mechanic or someone with limited knowledge about cars, understanding this error code is essential to ensure your vehicle’s optimal performance.
So, let’s dive in and unravel the mystery behind the DTC U11E9 Error Code together!
Table of contents
What Is the Dtc U11 E9 Error Code?
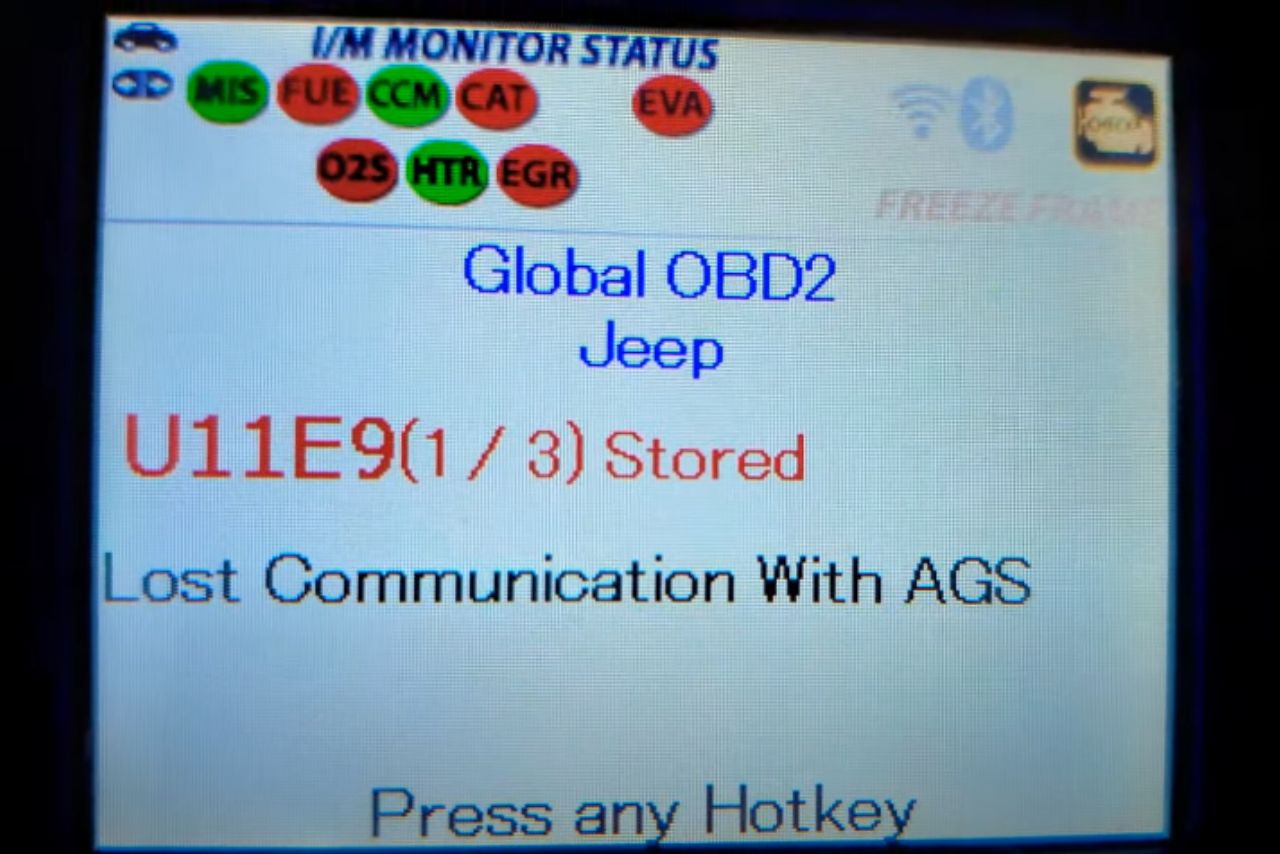
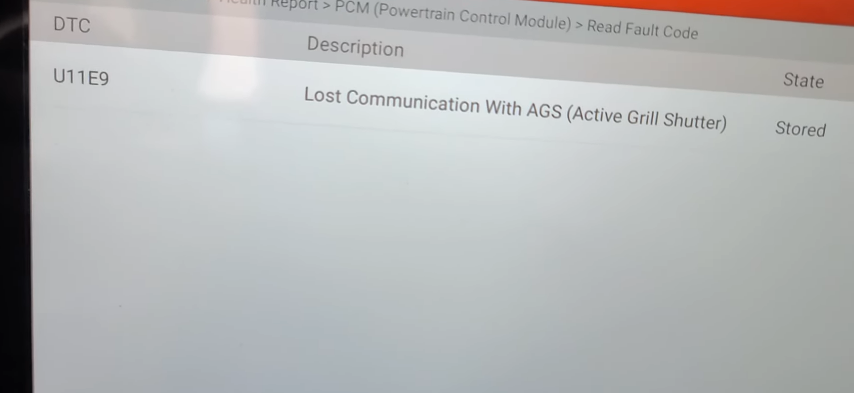
The DTC U11E9 error code is a diagnostic trouble code that commonly appears in vehicles. It indicates a problem with the communication circuit between the engine control module (ECM) and the fuel pump control module (FPCM). This code can be found in various car makes and models.
Here are some key points to understand about the DTC U11E9 error code:
Definition: The DTC U11E9 error code specifically refers to a lost communication issue between the ECM and FPCM. It means that there is a failure in transmitting necessary information related to fuel pump control.
Symptoms: When this error occurs, you may experience difficulties starting your vehicle or notice reduced engine performance. Additionally, warning lights such as Check Engine Light or Fuel Pump Control Module Malfunction Indicator Lamp may illuminate on your dashboard.
Causes: Several factors can contribute to the occurrence of this error code, including faulty wiring connections, damaged connectors, issues with ECM or FPCM software programming, or even problems with other related modules within the vehicle’s network.
Diagnosis: To diagnose this error accurately, it is recommended to use an advanced diagnostic scanner tool capable of reading manufacturer-specific codes. The scanner will retrieve relevant data from both ECM and FPCM modules for analysis.
Fixes: Depending on its root cause, fixing this error may involve different steps:
Start by checking all wiring connections and connectors associated with both ECM and FPCM for any signs of damage or loose connections. Repair or replace as needed.
If no physical issues are found during visual inspection, updating software/firmware for both modules might be required. Consult an authorized service center for assistance regarding software updates.
It is important to note that resolving the DTC U11E9 error code requires thorough analysis and appropriate automotive expertise.
Seeking professional assistance from qualified technicians or authorized service centers is highly recommended to ensure accurate diagnosis and efficient repairs.
Common Causes of the DTC U11E9 Error Code:
The DTC U11E9 error code can be triggered by various factors. Below are some common causes that may lead to this error:
Faulty ABS Control Module: A malfunctioning or defective ABS control module can generate the U11E9 error code. This component is responsible for controlling the anti-lock braking system and if it malfunctions, it can trigger the error.
Damaged Wheel Speed Sensors: The wheel speed sensors provide crucial data to the ABS control module regarding each individual wheel’s rotational speed. If any of these sensors are damaged or not functioning properly, it can result in a U11E9 error code.
Wiring Issues: Faulty wiring connections between the ABS control module and wheel speed sensors can also cause this error code to appear. Damaged wires, loose connections, or corroded terminals can disrupt communication and trigger the U11E9 code.
ABS Pump Motor Failure: The ABS pump motor plays a vital role in maintaining proper brake pressure during emergency braking situations. If this motor fails or becomes faulty, it can lead to erroneous readings and trigger the U11E9 trouble code.
Brake Fluid Contamination: Contaminated brake fluid with air bubbles or moisture can affect the performance of various components within the braking system, including the ABS control module and wheel speed sensors. This contamination could potentially lead to a U11E9 fault code being displayed.
Software Glitches: In some cases, software glitches within the vehicle’s electronic control unit (ECU) may cause intermittent issues related to anti-lock brakes functionality resulting in a false triggering of DTC U11E9.
It is important to note that while these are common causes associated with DTC U11E9, further diagnosis using professional diagnostic tools is recommended for an accurate identification of the underlying issue.
Symptoms of the DTC U11E9 Error Code:
Engine misfire: The engine may run unevenly, leading to a noticeable shaking or vibrating sensation. This can result in reduced performance and acceleration.
Difficulty starting the engine: You may experience difficulty starting your vehicle due to the U11E9 error code. The engine might take longer than usual to turn over or fail to start altogether.
Reduced fuel efficiency: If you notice a sudden decrease in your vehicle’s fuel efficiency, it could be attributed to the DTC U11E9 error code. This occurs because the problem affects proper combustion and results in excessive fuel consumption.
Inspect wiring and connectors: Carefully examine all wiring harnesses and connectors related to the affected components or systems. Look for signs of damage, corrosion, loose connections, or worn-out insulation that may be causing an electrical issue triggering the U11E9 code.
Test voltage levels: Use a multimeter to measure voltage levels at various points in the circuitry associated with the U11E9 code. Compare these readings against manufacturer specifications to identify any abnormalities indicating a faulty sensor, module, or power supply.
Check sensor functionality: Test sensors involved in generating data relevant to this error code using specialized tools or diagnostic equipment compatible with your vehicle make and model. Ensure that sensors such as wheel speed sensors or throttle position sensors are operating within acceptable ranges.
Verify system grounds: Adequate grounding is crucial for proper functioning of different electronic systems in your vehicle. Inspect ground connections specific to modules associated with the U11E9 code and ensure they are securely connected without any corrosion buildup.
Perform component tests: Utilize manufacturer-recommended procedures to test individual components potentially contributing to this error code’s occurrence—examples include testing ABS control modules, transmission solenoids, or engine control units (ECUs).
Consult technical service bulletins (TSBs): Check if there are any TSBs issued by your vehicle’s manufacturer related to known issues corresponding to the DTC U11E9 code—these bulletins may provide specific diagnostic steps or fixes recommended by the manufacturer.
Seek professional assistance: If you are unable to identify and resolve the DTC U11E9 error code on your own, it is advisable to consult a qualified automotive technician or contact your vehicle’s dealership for further diagnosis and repair.
Remember, diagnosing complex error codes like U11E9 may require specialized tools and expertise. Always prioritize safety precautions while working on your vehicle, and if in doubt, seek professional help from certified technicians.
To fix the DTC U11E9 error code, there are several methods you can try. Below are some effective solutions that can help resolve this issue:
Check and clean the throttle body: The throttle body may become dirty or clogged over time, leading to improper airflow and triggering the error code. To fix this, disconnect the battery, remove the air intake tube, locate the throttle body, clean it using a throttle cleaner spray and a soft cloth or brush. Make sure to follow manufacturer instructions for cleaning.
Inspect and replace damaged wiring: Faulty or damaged wiring can also cause the U11E9 error code. Inspect all wires connected to sensors related to engine control modules (ECM) for any signs of wear or damage such as fraying insulation or exposed wires. If any issues are found, carefully replace them with new ones.
Resetting ECM: Sometimes resetting your vehicle’s Engine Control Module (ECM) can clear temporary faults causing the U11E9 error code. Disconnecting your car’s battery for around 15 minutes will reset most ECUs/PCMs effectively.
Scan for other trouble codes: Perform a comprehensive scan of your vehicle’s onboard computer system using an OBD-II scanner tool capable of reading manufacturer-specific codes in addition to generic OBD-II codes. This will help identify if there are any other underlying issues contributing to the U11E9 error code.
Consult a professional mechanic: If none of these methods work or if you’re unsure about performing DIY fixes yourself, it is recommended to consult a certified mechanic who specializes in diagnosing and repairing automotive electrical systems.
Remember that fixing complex electronic issues like DTC U11E9 requires technical knowledge and expertise; therefore, seeking professional assistance is always advisable when in doubt.
Fix #1: Check and Replace Faulty Sensor:
If you encounter the U11E9 error code in your DTC (Diagnostic Trouble Code) system, it is likely due to a faulty sensor. This section will guide you through the steps to check and replace the faulty sensor.
To fix this issue, follow these simple yet effective steps:
Identify the Sensor: The first step is to identify which sensor is causing the U11E9 error code. Refer to your vehicle’s service manual or search online for information specific to your make and model.
Locate the Sensor: Once you have identified which sensor needs attention, locate its position within your vehicle’s engine compartment or other relevant area. You may need to remove some parts or panels for better access.
Inspect for Damage: Carefully inspect the sensor for any signs of physical damage such as corrosion, loose wires, or broken connectors. If you notice any issues, proceed with replacing it.
Disconnect Electrical Connection: Before removing the faulty sensor, disconnect its electrical connection by gently unplugging any connectors attached to it. Take note of how everything was connected so that you can easily reconnect later.
Remove Old Sensor: Depending on its location and design, use appropriate tools like wrenches or sockets to carefully remove the old sensor from its mounting position without causing further damage.
Install New Sensor: Take out a new compatible replacement sensor and securely install it into place following proper alignment procedures outlined in your vehicle’s manual if necessary.
Reconnect Electrical Connection: Ensure that all connections are properly secured by firmly plugging them back in as they were before removal ensuring no loose wiring remains exposed.
Remember that each vehicle may have different specifications and requirements when dealing with sensors; therefore consulting an expert mechanic might be beneficial if needed.
Fix #2: Resetting the Engine Control Module (ECM):
To address the DTC U11E9 error code, resetting the Engine Control Module (ECM) can often be an effective solution. This process clears any temporary faults or errors stored in the ECM and allows it to start fresh. Here’s how you can reset your ECM:
Disconnecting the Battery
Begin by locating your vehicle’s battery.
Using a wrench or socket set, carefully remove the negative (-) terminal from the battery.
Leave it disconnected for approximately 10-15 minutes.
Reconnecting the Battery
After waiting for some time, reconnect the negative (-) terminal back to its original position on the battery.
Ensure that it is tightly secured.
Starting Your Vehicle
Get into your car and start it as you normally would.
Allow it to run idle for a few minutes before driving.
Take It For a Test Drive
Now that your ECM has been reset, take your vehicle for a short test drive around your neighborhood. Observe if there are any recurring error codes or issues with performance.
If after performing this reset procedure you find that the error code persists or returns frequently, it may indicate an underlying problem requiring further investigation by a qualified mechanic or technician specializing in automotive diagnostics and repairs.
Remember to always exercise caution when working with electrical components of your vehicle and consult professional guidance if needed
Fix #3: Clearing Trouble Codes with a Scanner Tool
If you’ve encountered the U11E9 error code on your vehicle, one of the solutions to consider is clearing the trouble codes using a scanner tool.
This method involves accessing and resetting the onboard diagnostic (OBD) system in your car. Here’s how you can do it::
Obtain a scanner tool: Purchase or borrow an OBD-II scanner tool that is compatible with your vehicle’s make and model. These tools are readily available online or at automotive stores.
Locate the OBD-II port: The OBD-II port is typically located under the dashboard on the driver’s side of the vehicle. It may be covered by a small panel that can be easily removed.
Connect the scanner tool: Plug in one end of the scanner into the OBD-II port and turn on your vehicle’s ignition without starting its engine.
Access trouble codes: Follow instructions provided by your specific scanner tool to access trouble codes stored in your car’s computer system. Look for any codes related to U11E9 or other relevant issues.
Clear trouble codes: Once you have identified all relevant trouble codes, use your scanner tool to clear them from memory. This step will vary depending on which brand and model of scanner you are using, so refer to its user manual for guidance if needed.
Verify successful reset: After clearing the trouble codes, verify if they were successfully removed by checking for any remaining active or pending fault codes related to U11E9 or other issues.
By following these steps and utilizing an appropriate scanning tool, you can clear trouble codes associated with the U11E9 error and potentially resolve the underlying problem.
However, it is important to note that clearing codes will not fix any mechanical or electrical issues in your vehicle. If the error persists, seeking professional assistance from a qualified mechanic may be necessary.
Fix #4: Inspecting Wiring Connections for Loose or Damaged Wires:
When dealing with the DTC U11E9 error code, it’s important to check the wiring connections for any loose or damaged wires.
Faulty connections can often lead to communication issues between various components of your vehicle’s electrical system.
Here are some steps you can follow to inspect and address this potential problem:
Disconnect the Battery: Before beginning any work on your vehicle’s wiring, always disconnect the battery to prevent any accidental shocks or short circuits.
Visual Inspection: Start by visually examining all wiring connections related to the component associated with the DTC U11E9 error code. Look out for loose connections, frayed wires, corroded terminals, or any other visible signs of damage.
Tighten Loose Connections: If you come across any loose wiring connections during your inspection, use a suitable wrench or screwdriver (depending on the type of connection) to tighten them securely.
Repair Damaged Wires: In cases where you find damaged wires, such as those that are frayed or broken, you will need to repair them properly. Cut out the damaged section and strip off a small portion of insulation from both ends before joining them using appropriate connectors like butt connectors or soldering (if applicable). Ensure that all repairs are done securely and neatly.
Check Ground Connections: Pay special attention to ground connections as they play a crucial role in ensuring proper electrical flow throughout your vehicle’s system. Make sure ground wires are securely attached and free from corrosion.
Perform Function Test: Once all necessary repairs have been made and everything is reconnected correctly, perform a function test by starting up your vehicle and checking if the DTC U11E9 error code has been resolved.
Remember that if you’re unsure about handling complex wiring issues yourself, it’s always best to seek professional assistance from a qualified mechanic or technician. They have the experience and tools necessary to diagnose and fix any underlying problems effectively.
By inspecting your wiring connections for loose or damaged wires, you can eliminate potential causes of the DTC U11E9 error code and ensure smooth functioning of your vehicle’s electrical system.
Prevention Tips for Avoiding Future Occurrences of the DTC U11E9 Error Code:
To prevent future occurrences of the DTC U11E9 error code, follow these tips:
Regularly maintain your vehicle: Perform routine maintenance tasks such as oil changes, air filter replacements, and spark plug inspections according to the manufacturer’s recommendations. This helps ensure that all components are functioning properly and reduces the risk of triggering error codes.
Keep your vehicle’s software up to date: Manufacturers often release software updates to address known issues or improve performance. Check with your vehicle manufacturer or authorized service center for any available updates and have them installed regularly.
Avoid aggressive driving habits: Hard acceleration, sudden braking, and excessive speeding can put stress on various components in your vehicle, potentially leading to errors like the DTC U11E9 code. Practice smooth driving techniques and avoid putting unnecessary strain on your car.
Use quality fuel: Low-quality or contaminated fuel can cause engine misfires and other problems that may trigger error codes like U11E9. Always fill up at reputable gas stations that provide clean fuel options.
Check wiring connections: Periodically inspect all wiring connections related to sensors, modules, and control units in your vehicle for signs of damage or corrosion. Secure any loose connections promptly as they can lead to communication errors between components.
Address other diagnostic trouble codes (DTCs) promptly: If you encounter any other diagnostic trouble codes alongside U11E9, resolve them promptly as they may be interconnected with each other or contribute to triggering subsequent error codes.
Consult a professional technician: If you’re unsure about how to resolve an issue related to the DTC U11E9 error code or if it keeps recurring despite following preventive measures, it is advisable to consult a qualified automotive technician who has experience dealing with similar problems in order to diagnose and fix the issue accurately.
By following these preventive measures, you can minimize the chances of encountering the DTC U11E9 error code in your vehicle’s future operations.
About the author
Jack Oliver
Jack Oliver, is a car enthusiast with a keen eye for choosing the perfect accessories for cars and conducting thorough testing of various automotive products. Jack’s expertise lies in exploring the world of oils, lubricants, additives, and other accessories that enhance the performance, aesthetics, and overall driving experience.


Leave a Reply